将本地仓库批量上传至 Gitee、Github、Gitlab 平台(目前仅支持 Gitee ) 工具采用 Go 编写,算是跟 Go 的第一次亲密接触了 功能特点
注意事项
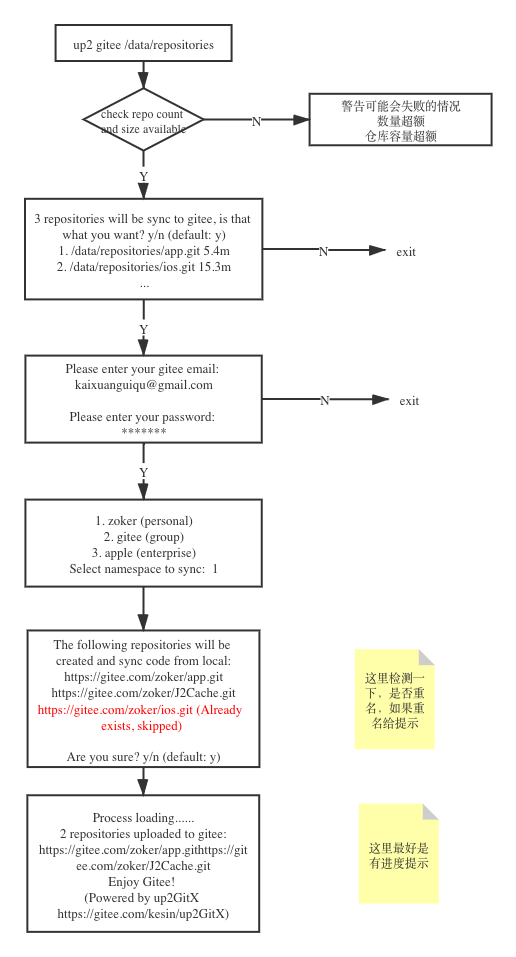
设计流程
使用简介下载对应平台的二进制包,可直接运行
以 Gitee 为例 ➜ up2GitX git:(master) ✗ ./up2 gitee -h This command is used for sync local repo to Gitee Name: gitee Usage: ./up2 [Global Options...] gitee [--option ...] [argument ...] Global Options: --verbose Set error reporting level(quiet 0 - 4 debug) --no-color Disable color when outputting message -h, --help Display this help information Arguments: repoSource Tell me which repo dir or list your want to sync, is required Examples: Using dir: ./up2 gitee /Zoker/repos/ Dir example $ ls -l /Zoker/repos/ drwxr-xr-x 4 zoker 128B Jun 1 19:05 git-work-repo1 drwxr-xr-x 4 zoker 128B Jun 1 19:02 taskover drwxr-xr-x 4 zoker 128B Jun 1 19:03 blogine drwxr-xr-x 3 zoker 96B Jun 1 12:15 git-bare-repo3 ... Using file: ./up2 gitee /Zoker/repos.list File example $ cat /Zoker/repos.list /tmp/repos/git-work-repo1 /Zoker/workspace/git-work-repo2 /other/path/to/git-bare-repo3 ... 使用示例这里以上传到 Gitee 为例 1、指定 RepoSource可以是一个包含很多 Git 仓库的目录,也可以是一个包含很多 Git 仓库绝对路径的文本文件,下面以目录为例
确认这些 Git 仓库是不是你所预期的 2、输入 Gitee 账号信息并选择同步到哪个 Namespace
输入注册 Gitee 所用的邮箱以及密码,认证成功后会列出可用的 Namespace,在 Gitee 上,它可以是个人名下、组织名下或者企业名下。(目前仅支持上传到个人名下,后续接口功能到位会支持组织和企业) 3、确认将要生成的仓库链接并选择公开属性
确认要生成的仓库链接是否符合预期,示例中有中文是为了演示错误选项的处理,如果确认无误,选择仓库的公私有属性 4、在 Gitee 上创建仓库并展示结果
可以看到有一个创建成功,一个创建失败,一个已经存在同名地址 对于失败的,会提示我们选择是否跳过或者退出修复错误,这里我们选择跳过
紧接着会提示对于已经存在的项目该怎么处理,你可以选择跳过,也可以选择本地强制覆盖远端,这里我们选择强制覆盖 5、同步代码到 Gitee
同步代码完成后会给出每一个代码仓的具体同步状态 这个时候我们前往 Gitee 查看动态
可以看到本地的分支已经推送到 Gitee 平台,这里的同步是会同步所有的本地分支和标签,图中的强制推送就是我们刚刚选择了覆盖,所以工具会强制用本地的代码覆盖远端 Gitee 的代码,所以请想清楚,再做选择。 构建项目使用 需要注意的是要修改对应的 OAuth 客户端的 修改 params := fmt.Sprintf(`{
"grant_type": "password",
"username": "%s",
"password": "%s",
"client_id": "xxxx", // client id from Gitee
"client_secret": "xxxx", // client secret from Gitee
"scope": "user_info projects groups enterprises"
}`, email, password)
通过对 Client 的信息的改动可以支持 Gitee 公有云以及大部分的 Gitee 私有云客户。 感谢
贡献代码欢迎提交 Github 以及 Gitlab 的上传支持!
贡献者@Zoker |