CSS 盒子样式
我不会将太多 CSS 重置的细节,那些在我之前的教程中很明了了。我创建了一个默认的排版,并将内置 #content 的div居中。这样创建了一个允许jQuery在页面最上面添加新警告元素的盒子区域。
/** typography **/
h1 {
  font-family: 'Helvetica Neue', Helvetica, Arial, sans-serif;
  font-size: 2.5em;
  line-height: 1.5em;
  letter-spacing: -0.05em;
  margin-bottom: 20px;
  padding: .1em 0;
  color: #444;
	position: relative;
	overflow: hidden;
	white-space: nowrap;
	text-align: center;
}
h1:before,
h1:after {
  content: "";
  position: relative;
  display: inline-block;
  width: 50%;
  height: 1px;
  vertical-align: middle;
  background: #f0f0f0;
}
h1:before {
  left: -.5em;
  margin: 0 0 0 -50%;
}
h1:after {
  left: .5em;
  margin: 0 -50% 0 0;
}
h1 > span {
  display: inline-block;
  vertical-align: middle;
  white-space: normal;
}

p {
  display: block;
  font-size: 1.35em;
  line-height: 1.5em;
  margin-bottom: 22px;
}


/** page structure **/
#w {
  display: block;
  width: 750px;
  margin: 0 auto;
  padding-top: 30px;
}

#content {
  display: block;
  width: 100%;
  background: #fff;
  padding: 25px 20px;
  padding-bottom: 35px;
  -webkit-box-shadow: rgba(0, 0, 0, 0.1) 0px 1px 2px 0px;
  -moz-box-shadow: rgba(0, 0, 0, 0.1) 0px 1px 2px 0px;
  box-shadow: rgba(0, 0, 0, 0.1) 0px 1px 2px 0px;
}

.flatbtn {
  -webkit-box-sizing: border-box;
  -moz-box-sizing: border-box;
  box-sizing: border-box;
  display: inline-block;
  outline: 0;
  border: 0;
  color: #f9f8ed;
  text-decoration: none;
  background-color: #b6a742;
  border-color: rgba(0, 0, 0, 0.1) rgba(0, 0, 0, 0.1) rgba(0, 0, 0, 0.25);
  font-size: 1.2em;
  font-weight: bold;
  padding: 12px 22px 12px 22px;
  line-height: normal;
  text-align: center;
  vertical-align: middle;
  cursor: pointer;
  text-transform: uppercase;
  text-shadow: 0 1px 0 rgba(0,0,0,0.3);
  -webkit-border-radius: 3px;
  -moz-border-radius: 3px;
  border-radius: 3px;
  -webkit-box-shadow: 0 1px 0 rgba(15, 15, 15, 0.3);
  -moz-box-shadow: 0 1px 0 rgba(15, 15, 15, 0.3);
  box-shadow: 0 1px 0 rgba(15, 15, 15, 0.3);
}
.flatbtn:hover {
  color: #fff;
  background-color: #c4b237;
}
.flatbtn:active {
  -webkit-box-shadow: inset 0 1px 5px rgba(0, 0, 0, 0.1);
  -moz-box-shadow:inset 0 1px 5px rgba(0, 0, 0, 0.1);
  box-shadow:inset 0 1px 5px rgba(0, 0, 0, 0.1);
}
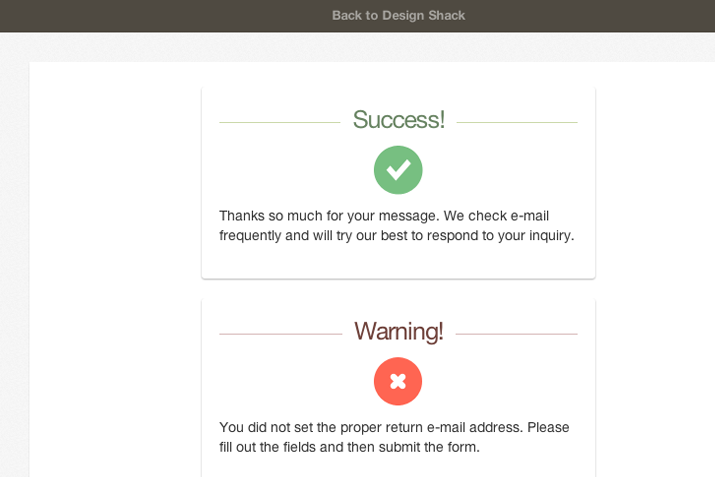
让效果更醒目的网页布局非常简单。任何熟悉前端网页开发的人都应该能够将其移植到自己的样式表中。我在这个扁平按钮中使用了特殊的样好似,并生成新的警告窗口。同样的,我更新了每个 .notify类元素的内部样式。
/** notifications **/
.notify {
  display: block;
  background: #fff;
  padding: 12px 18px;
  max-width: 400px;
  margin: 0 auto;
  cursor: pointer;
  -webkit-border-radius: 3px;
  -moz-border-radius: 3px;
  border-radius: 3px;
  margin-bottom: 20px;
  box-shadow: rgba(0, 0, 0, 0.3) 0px 1px 2px 0px;
}

.notify h1 { margin-bottom: 6px; }

.successbox h1 { color: #678361; }
.errorbox h1 { color: #6f423b; }

.successbox h1:before, .successbox h1:after { background: #cad8a9; }
.errorbox h1:before, .errorbox h1:after { background: #d6b8b7; }

.notify .alerticon {
  display: block;
  text-align: center;
  margin-bottom: 10px;
}
我设置了一些在我的布局示例中运行良好的默认假设。所有消息通知窗口都被限定为 400px 宽,并通过使用 margin: 0 auto 在页面中居中。同时,我更新了鼠标图标为手指指针,这样用户就知道该元素可点击。我们需要创建一个 jQuery 事件{敏感词}以用于获取用户对取消通知窗口的点击,并运行相应函数。